Step-by-Step Guide to DIY iPad Troubleshooting
In today’s digital age, iPads have become an integral part of our daily lives, serving as a hub for work, entertainment, and communication. However, like any electronic device, iPads can sometimes encounter issues that disrupt our experience. Before rushing to the nearest repair shop, it’s often worth trying some DIY troubleshooting steps to address common problems. In this guide, we’ll walk you through a step-by-step process to troubleshoot and potentially resolve minor iPad issues on your own. For more complex problems, we recommend seeking expert help from a professional repair service like “Repair Buddy.”
Restart Your iPad
The first step in troubleshooting any electronic device is to restart it. A simple restart can resolve many minor glitches and software-related issues. Here’s how to do it:
a. Press and hold the power button on your iPad (usually located on the top or side) until you see the “Slide to power off” slider.
b. Slide the slider to turn off the iPad.
c. Wait a few seconds and then press and hold the power button again until the Apple logo appears, indicating the device is restarting.
Check for Software Updates
Outdated software can cause a variety of issues, including bugs and incompatibility problems. To ensure your iPad is running smoothly, make sure you have the latest software updates installed:
a. Go to “Settings.”
b. Scroll down and tap “General.”
c. Select “Software Update.”
d. If an update is available, follow the on-screen instructions to download and install it.
Clear Storage and Manage Apps
Running out of storage space can slow down your iPad and lead to performance issues. To free up space:
a. Go to “Settings.”
b. Tap “General.”
c. Select “iPad Storage.”
d. Review the apps using the most storage and delete unnecessary apps or files.
Check Internet Connection
If you’re experiencing slow internet or connectivity issues, it might not be your iPad’s fault. Troubleshoot your Wi-Fi connection:

a. Go to “Settings.”
b. Tap “Wi-Fi.”
c. Select your network and tap “Forget This Network.” Then, reconnect and enter your Wi-Fi password.
Reset Network Settings
If your iPad is still having network issues, you can try resetting network settings:
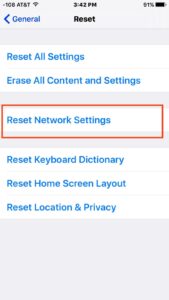
a. Go to “Settings.”
b. Tap “General.”
c. Scroll down and select “Reset.”
d. Tap “Reset Network Settings” and confirm your choice.
Check for Hardware Problems
If you’ve followed these steps and your iPad is still malfunctioning, it’s possible that the issue is hardware-related. Look for signs of physical damage, such as cracked screens or buttons that are stuck. If you find any hardware issues, it’s time to contact a professional repair service.
When to Seek Professional Help: Repair Buddy
While DIY troubleshooting can resolve many common iPad issues, there are cases where professional assistance is essential. This includes hardware problems, water damage, or issues that persist despite your best efforts. For these situations, a service like “Repair Buddy” can provide expert repairs and solutions for your iPad.
Repair Buddy is your go-to partner for iPad repairs. Their skilled technicians are experienced in diagnosing and fixing various hardware and software issues, ensuring your device is restored to its full functionality. To get help from Repair Buddy, visit their website or contact them directly for a quote and to schedule a repair.
iPad Repair Melbourne
Your iPad is a valuable device, and it’s worth trying some DIY troubleshooting steps before rushing to seek professional repair services. Simple solutions like restarting, updating software, and managing storage can resolve many common issues. However, for more complex problems, don’t hesitate to reach out to a reliable repair service like Repair Buddy, who can offer expert assistance in restoring your iPad to its full potential. By following these steps, you can keep your iPad running smoothly and extend its lifespan.